I am writing this primarily as a beginners guide but also to serve as a dump of all my own knowledge so when I inevitably forget this, I can come back and reference it! Ever since Microsoft introduced their two-factor requirements for MSPs this year, I’ve been struggling to come up with a comprehensive solution that worked for me from start to finish. I think this is partially because it’s a multi-stage problem, and in my experience it’s often the case that Microsoft’s own examples either don’t work well or don’t work properly when utilising delegated partner permissions.
Before I start with this post, let me be clear that what I am about to suggest is not necessarily the right way or the best way to achieve this. I am not omniscient, this is simply my best interpretation based on what I know and I absolutely welcome people’s input in to alternate ways to approach this as well as pointing out any errors I may have made here!
I intend this to be Part 1 in a series of articles designed to help specifically MSPs utilise PowerShell and Office 365 to their advantage.
What are delegated admin privileges?
Simply put, it’s a way of utilising your own credentials to access things in your clients tenant. That way, you only have one set of credentials that you need to remember, and with it you can manage all of your clients without having to log on with a specific global admin account. It sounds simple in theory, but in reality you don’t get full access. Access to a number of security related settings is restricted and certain things don’t work properly. You can find out how to set this up at https://docs.microsoft.com/en-us/partner-center/customers_revoke_admin_privileges
Can I not just use my delegated access in PowerShell scripts?
Yes and no. This is where it gets confusing. It differs for a number of Microsoft PowerShell modules. When you are utilising PowerShell to connect your tenants, most frequently with some sort of Connect- verbage, to be able to access your underlying client you need to specify the tenant id of that particular client. To understand the difficulty, you have to understand the modules that are available and also understand why they are different in certain circumstances.
Powershell Module: MSOnline
Documentation: https://docs.microsoft.com/en-us/powershell/module/msonline/?view=azureadps-1.0
Install:
Install-Module MSOnlineOut of all of the modules, I find this the easiest to deal with. It can easily be used interactively to loop through your client tenants. Connecting interactively is easy:
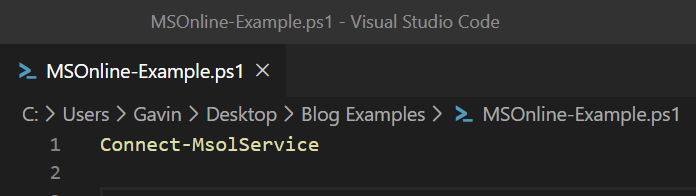
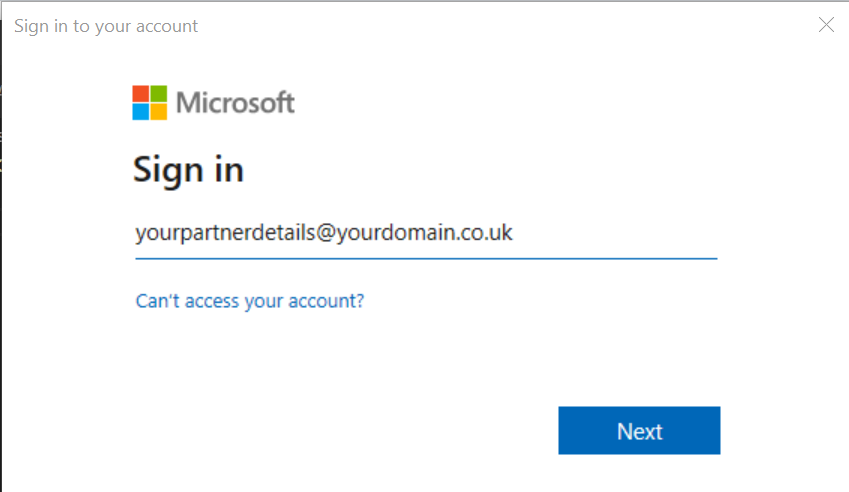
Running this will pop up a modern authentication prompt that supports 2FA, where you can login.
It will appear that nothing will happen, but in-fact you are now authenticated to the MSOnline module and you’re ready to run commands. You’ll notice that if you run
Get-MSOLCompanyInformation
You get an output containing information about your own partner tenant:
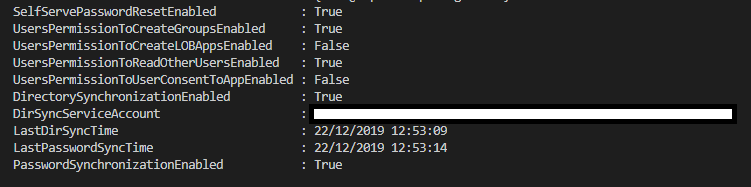
Handy, but not amazing. What if we could get that information out for all tenants? Run the following command:
Get-MSOLPartnerContract -All
You will see it outputs a list of Tenant IDs. We can utilise these.
Connect-MsolService

# Get all of my customers in to a variable, the All is important or the results could be limited
$AllCustomers = Get-MsolPartnerContract -All

# We now want to loop through these one by one, for this we use a foreach loop
foreach ($IndividualClient in $AllCustomers) {

    # Each time this loops, take out the TenantID for that individual client and apply it against the Get-MSOLCompanyInformation Cmdlet
    Get-MsolCompanyInformation -TenantId $IndividualClient.TenantID
}
If you run this, you will see it output all information for all companies! This is how the -TenantID switch works. Once you are authenticated, you can utilise it to get information about that particular tenant.
At this point, it’s just a case of utilising PowerShell to clean up the output. Step 1 is putting all this information in one place so we can export it in a reasonable format.
Final Script: Output information about Clients with AD Sync Enabled including Last Sync Time
Connect-MsolService


# Get all of my customers in to a variable, the All is important or the results could be limited
$AllCustomers = Get-MsolPartnerContract -All


# This is a holding array that gets added to for each iteration of the foreach loop.
$AllCustomerDataArray = @()


# We now want to loop through these one by one, for this we use a foreach loop
foreach ($IndividualClient in $AllCustomers) {


    # Each time this loops, take out the TenantID for that individual client and apply it against the Get-MSOLCompanyInformation Cmdlet
    $IndividualResult = Get-MsolCompanyInformation -TenantId $IndividualClient.TenantID


    # Now we have all of the information in $IndividualResult, we can get the information out we want and put it in our own object, in this case a hashtable
    $IndividualResultHashTable = [pscustomobject]@{
        TenantID = $IndividualClient.TenantId
        CustomerName = $IndividualResult.DisplayName
        LastDirSyncTime = $IndividualResult.LastDirSyncTime
        PasswordSynchronizationEnabled = $IndividualResult.PasswordSynchronizationEnabled
    }


    # Add all of that custom information in to the Array
    $AllCustomerDataArray += $IndividualResultHashTable
}


# Take the results, $AllCustomerDataArray and Export the results to CSV - make sure that the folder exists. No Clobber and No Type Information clean up the output a bit.
# Get-Date bit is just a fancy way of putting the date in to the file name.
$AllCustomerDataArray | Export-Csv "C:\Temp\Client AD Sync Information - $(get-date -f yyyy-MM-dd).csv" -NoClobber -NoTypeInformation
Boom! As simple as that you now have a report that tells you whether AD Sync is on for all of your clients, including the last time they synced. It is ALWAYS worth inspecting each object in PowerShell to see what else you can extract. In the same session for example, type the following:
$IndividualResult | Select * | Out-GridViewBiggest Tip: You’ll get a grid popup showing all the information that’s available. You will likely find doing this that you come across something worthwhile. I always do this when extracting data from anything and I often find additional information that I think would be suitable
Utilising the same methods, lets investigate Get-MSOLUser.
Get-MSOLUser
This is the command I use most frequently for extracting information out of Office 365. To see the wealth of information at your fingertips run:
Get-MSOLUser | Select * | Out-GridView
So much information!! Lets see what we can do..
Final Script: Output information about all users and their licensing
Connect-MsolService


# Get all of my customers in to a variable, the All is important or the results could be limited
$AllCustomers = Get-MsolPartnerContract -All


# This is a holding array that gets added to for each iteration of the foreach loop.
$AllCustomerDataArray = @()


# We now want to loop through these one by one, for this we use a foreach loop
foreach ($IndividualClient in $AllCustomers) {


    # Each time this loops, get a list of all users for this particular client using Get-MSOLUser. Make sure you specify -All to get all users.
    $ClientAllUsers = Get-MsolUser -TenantId $IndividualClient.TenantId -All


    # Now we need to loop through the users
    foreach ($User in $ClientAllUsers) {


        # I've picked a number of different types of items here to give examples on how to format and extract the information that is displayed
        $IndividualResultHashTable = [pscustomobject]@{
            SignInName = $User.SignInName # Extracting a simple string
            DisplayName = $User.DisplayName # Extracting a simple string
            IsLicensed = $User.IsLicensed # Extracting a simple string
            WhenCreated = $User.WhenCreated # Extracting a date
            PrimaryEmailAddress = $($User.'ProxyAddresses' -clike 'SMTP:*') -replace '^SMTP:' # Extracting from primary email address using a case sensitive like, then removing the SMTP: from the string
            AdditionalEmailAddresses = $($User.'ProxyAddresses' -cnotlike 'SMTP:*') -replace '^smtp:' -join "," # Extracting additional email addresses using a case sensitive not like, then removing smtp: from the string
            Licenses = ($User.Licenses.AccountSKU.SkuPartNumber) -join "," # Extracting where there are multiple items in a property and joining them with a comma
            StrongPasswordRequired = $User.StrongPasswordRequired # Extracting a boolean (true false value)
        }

        # Add this user to the entire array
        $AllCustomerDataArray += $IndividualResultHashTable
    }
}


# Take the results, $AllCustomerDataArray and Export the results to CSV - make sure that the folder exists. No Clobber and No Type Information clean up the output a bit.
# Get-Date bit is just a fancy way of putting the date in to the file name.
$AllCustomerDataArray | Export-Csv "C:\Temp\Client User Information - $(get-date -f yyyy-MM-dd).csv" -NoClobber -NoTypeInformation
This follows exactly the same structure, but it utilises a bit of PowerShell when creating the hash table to make sure the content displays how I want it to. Getting a simple value out of this can be just as simple as $User.SignInName but sometimes it’s not as easy as that. Take the user licenses for example, if you were just output $User.Licenses it would look like this:

Not really helpful for an output. Each box represents a license, and as you can see there is a lot of information about each license.
If we delve in to AccountSKU with $User.Licenses.AccountSKU

Again, not helpful but we’re making progress. The SkuPartNumber looks perfect. We can get that with $User.Licenses.AccountSKU.SkuPartNumber

That’s great! Well, it nearly is. There are two results there. To get them in to one we need to join them.
($User.Licenses.AccountSKU.SkuPartNumber) -join “,”
![]()
Now we have an output that will work well in a spreadsheet or CSV. Extracting data from PowerShell is an iterative process, as you can see above.
Big Tip: Utilise Visual Studio Code with Debugging and breakpoints to stop the script at certain parts and see a list of all information on the left hand side when debugging.


Great primer, Gav. Nice work.
Is there specific group/role I need to have to run commands against the tenants I have delegated admin rights too? Global admin access has been verified in the partner relationship settings of a selection of the tenants,
I can query the tenant IDs but that’s it..
Get-MsolUser : Access Denied. You do not have permissions to call this cmdlet.
Get-MsolRole : Access Denied. You do not have permissions to call this cmdlet.
Get-MsolCompanyInformation : Access Denied. You do not have permissions to call this cmdlet.
Great post and very useful. GA access and delegated permissions are a constant worry for me. Grammar suggestion : there seems to be a fad at the moment to replace the word “use” with “utilise” everywhere when they do in fact have different meanings. At least you arent’ using a ‘z’ in the word eh?